Hardwood Flooring Basics
With all the flooring products to choose from, it’s tough to make a decision. Now more than ever we have a great selection of luxury vinyl, laminates, and tile flooring that are all beautiful and many times are hard to tell apart from genuine wood flooring. However, the premium flooring that stands out from the rest is still solid wood. But, even if you definitely want wood there is still a lot to consider. And, with that kind of financial commitment you’ll want to make sure you choose the right materials, and installation methods, for your room.
So back to the basics – here’s what you need to think about when choosing the type of wood flooring, and how to plan the installation.
How to Choose Harwood Flooring
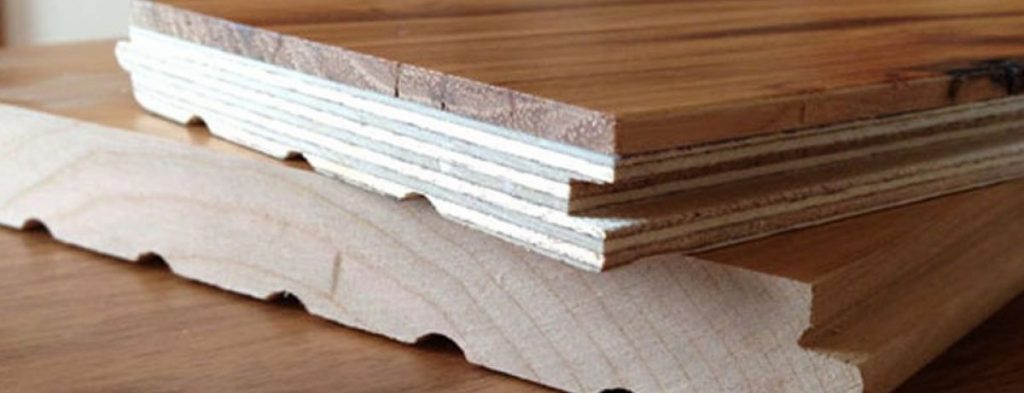
Solid or Engineered Hardwood Flooring
Long ago hardwood flooring came in thick wide planks of solid timber – basically milled lumber laid down on your floor. Today, solid hardwood is still widely available, but many companies also offer engineered flooring—planks made with a thinner top layer of hardwood, glued to layers beneath that designed to prevent the floor from shifting during expansion and contraction cycles. Wood moves with age, and if you’ve ever walked on a creaky hardwood floor you know why they made engineered flooring.
For basements and apartments with concrete subfloors, engineered flooring offers an installation advantage. Whereas solid wood is generally installed over one or two layers of plywood, which can raise the height of a floor and interfere with existing doors or marginally reduce ceiling height. Engineered flooring can be glued directly to concrete, or usually over a moisture barrier (plastic or tar paper). I have a concrete foundation but still laid down plywood under my engineered flooring for padding, but it wasn’t absolutely necessary.
Both solid wood, and engineered, flooring material is meant to be sanded and refinished over time. However, it’s important to note that lower cost engineered flooring doesn’t have a top layer thick enough to be refinished more than once…or even once in some cases. But both types are limited in the amount of time you can refinish. Once you’ve sanded down too much you reach the tongue of the materials, and it will show. Generally solid wood floors can be refinished more times than engineered.
For my engineered floors I paid top price. They have a very thick top layer that can be refinished more than once. However, years after it was installed my wife bought an Australian Shepard who scratched the heck out of the floors. Therefore, in hindsight solid hardwood might have been a better choice since it can be sanded more times. However, our engineered wood flooring has remarkable stability and resistant to warping – after 10 years there are zero creaks or warps!
Advantages of solid hardwood flooring include:
- Can be sanded and refinished several times over the lifetime of the floor
- Thick flooring layers offers a solid feel underfoot
- Sound transmission is better than engineered hardwood
- Normally sold unfinished, so can be stained in any color desired
Advantages of engineered hardwood flooring include:
- Extremely stable flooring especially when in contact with concrete subfloor
- Cheaper than solid hardwood
- Easier installation than solid hardwood; amateur DIY installation is possible
- Generally sold prefinished, reducing work required for installation
Choose Prefinished or Site Finish
Hardwood planks can be purchased with a raw face that gets finished by a professional after installation, or prefinished, which arrives with the stain and topcoat already applied. The advantage of prefinished wood is that you know exactly what you’re getting. Prefinished flooring also takes less time to install, because there’s no need to apply color or sealant. The disadvantage has to do with why folks prefer engineered hardwood flooring – wood moves. You get the wood home and install it on your floors only to find that the floor is uneven due to the wood moving during shipment, or at the time it was installed. You could even have a slightly not level floor. Finishing your floors after the install avoids these problems entirely.
If you do choose a on-site finish make sure to get top-notch finishing contractors. This will bring up your costs, but you want your finish to be showroom quality. On-site finishing allows for a level of customization that appeals to many homeowners and designers. More color, and sheen selections, and they are smoother than pre-finished. But all these advantages only if your installation and finishing contractors are skilled.
Choose the Type of Finish
There’s a whole spectrum of finishing products, from oil finishes to site-finish polyurethanes to prefinished UV-cured urethane finishes. Almost all finishes are either oil or polyurethane, and many are hybrids of both.
Oil penetrates the wood and has a look and feel that’s very soft and natural. Polyurethane looks more “plastic”. But it isn’t as impervious to stains and damage as polyurethane, which creates a hard topcoat on the surface of the wood that’s more resilient to wear and tear, especially for people with children and pets. Oil finishes scratch more easily, but also make scratches less noticeable. Also, oil based finishes are easier to repair. When refinishing a urethane finish you’ll need to vacate the area for days.
We won’t get into the advantages and disadvantages of all types, however it’s worth noting – don’t use water-based finishes! They have less odor, are better for the environment, are generally easier to apply, and don’t yellow over time. Sound great right? Well, they don’t hold up to wear. You’ll be refinishing in no time.
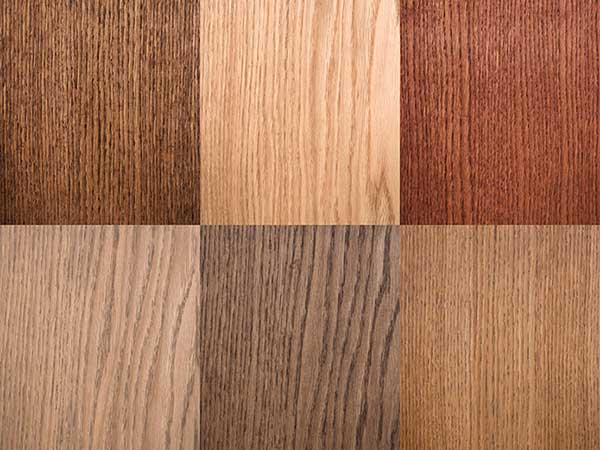
Considering Wood Types
In North America Oak is the most prevalent. It’s durable, not too expensive, and takes stains and finishes well. White Oak has become very popular with a more modern look than Red Oak – many stained grey which is extremely popular. Walnut is also very popular in the US. It’s readily available, has beautiful warm tone, but is slightly less durable than Oak. Other popular American hardwoods include hickory, cherry, maple, and ash. I prefer maple as it’s a very hard wood, and (to me at least) fits well with both modern and traditional furnishing.
South American hardwood flooring has become more popular. Brazillian Cherry, Tigerwood, Mahogany, and Teak are a few of the most common. They’re some of the hardest flooring material, and are not necessarily a higher cost. However, many consider them a bit dark, and overwhelming over time.
When considering wood type, try to imagine looking at it for 10 or 20 years. Simple can often be the best choice. Overall it’s a personal choice, unless you’re managing wear issues. In that case rank them by durability first, and consider site finishing as you’ll be able to lay down a thicker coat.
Plank Width
Traditional wood plank size was about 3 inches, however wide planks have become trendy. Depending on the size of the room, and how modern your designs, wider planks may fit very nicely. The cost can be much higher, however I love floors done with a wider plank size as they just seem to be a bit more luxurious.
You should consider wide planks, and put the planks from the same manufacturer side-by-side when deciding. However, do give consideration that wider planks mean fewer seams. This may look more attractive but with solid hardwood flooring the movement could cause plank seams to move more, therefore making them more prominent. You may consider this, and factor it into deciding to go with solid or engineered flooring.
To Install Your Hardwood Floors
Tools and Materials
Depending on the type of hardwood flooring you’re installing, you may need different tools and materials. If you’re gluing the flooring on, mostly what you’ll need a rubber mallet and the glue – big gallon jugs of elmers.For nailing it on you need a pneumatic flooring nailer, or a pneumatic staple gun and an air compressor. For setting up the sub-flooring you’ll need other tools and materials such as drill and drill bits, hammer, nails, pry bar and saw. A circular saw is the minimum you’ll need, but for framing off around doors or entry ways it’s nice to have a table saw and miter saw. Consult the instructions included with your flooring and make sure you have all tools ready and within reach.
Subfloor/ Underlayment Requirements
Both solid hardwood and engineered hardwood flooring require solid, sturdy subfloors, and may require some form of secondary underlayment installed over the subfloor. Many times you can use the existing old floor, if still solid, can make a great subfloor.
- Wood subfloors of plywood or OSB are the standard underlayment for hardwood flooring. If they are in good condition, no interim underlayment is necessary. Otherwise, a thin secondary plywood underlayment can be laid down over the subfloor to create a solid base. Wood subfloors must be structurally sound and free from movement.
- Concrete: When installing hardwood flooring on concrete, it must be at least 30 days old and must have passed all moisture tests. Engineered wood is considered a better choice for installation directly on concrete. Solid hardwood flooring can be susceptible to the moisture migrating through concrete, so it can be installed on a layer of plywood attached to sleepers laid on the concrete to isolate it from dampness.
- Tile, or vinyl: Existing tile or vinyl flooring that is in good condition—well attached and perfectly flat—can be an acceptable base for laying new hardwood flooring. The thickness of multiple flooring levels can be an issue, though.
Costs
Costs of hardwood flooring are about equal to the cost of the materials. Solid hardwood flooring runs $5 to $8 per square foot for materials and installation. Costs of engineered hardwood flooring run from $3 to $10 per square foot for both as well. Cost variations in engineered hardwood are dictated by the type of surface hardwood veneer and its thickness. Thicker veneers cost more than thin veneers.
Costs for installation can vary quite a bit based on how careful, and thorough, with the subfloor. My house has a concrete foundation, so to avoid moisture issues and creaking when the house shifts I laid down a moisture barrier that acts as a pad (basically thick plastic), and two layers of 3/8” plywood. Two layers of plywood are glued together and insure that shifts in the foundation will not create gaps, allow creaking, and is softer on top of concrete. However, most installers think 2 layers under engineered is overkill.
Pro Tips for Installation
Much of the success of any hardwood flooring installation depends on good preparation of the subfloor and underlayment.
- Try to match your prep work to the cost of materials – the more expensive the flooring the more thorough your subfloor. You wouldn’t want to go big on flooring only to have it creak, or have other issues later just because of a cheap install.
- Complete removal down to the subfloor is usually best. You can sometimes install on top of the old flooring, but it’s rarely ideal.
- Test for any moisture issues, especially over concrete. Always use a moisture barrier when installing over concrete.
- Thoroughly clean and vacuum underlayment before beginning installation of flooring planks.
- Always remove baseboards before installing any flooring.
- Store the hardwood planks for several days in the area they will be installed before beginning. This will allow them to adjust to humidity conditions and can prevent later warping.
- To minimize chipping, use fine-tooth, carbide-tipped blade to cut hardwood flooring.
- Surfaces must be flat and smooth. Floor-leveling compound can be used to fill uneven spots. Install a plywood underlayment if the subfloor is not smooth and secure.
- Make sure to leave narrow expansion gaps at the walls. These gaps will allow for seasonal expansion of the wood; they will be hidden when base moldings are installed.
Very rarely can people tell the difference between solid and engineered hardwood flooring. And, the costs difference is minimal. So, if it fits with the guidelines here and you love the product – don’t try and skimp! Buy what you love the most. You’ll be looking at it for a very long time.